


When clearing out a late parent’s home, few belongings create more emotional friction than family photo albums. Unlike furniture or kitchenware, photographs feel irreplaceable. Yet facing stacks of dusty binders, sticky “magnetic” albums, and shoeboxes of loose prints can easily trigger decision fatigue—especially while grieving.
The goal is not to preserve every single print your parents ever accumulated. The real goal is to protect your family’s actual history: the defining portraits, the candid milestones, and the stories behind them, while giving yourself permission to let go of the clutter.
This guide outlines a methodical, archivist-approved process for sorting, preserving, digitizing, and sharing inherited photo albums without losing the context that makes them meaningful.
1. The Cardinal Rule: Do Not Distribute Originals Yet#
When multiple siblings or relatives are involved, the most common instinct is to divide the physical albums immediately.
Resist this urge.
Distributing physical prints before organizing and digitizing fractures the collection. An album often follows a chronological narrative that only makes sense when viewed in sequence. If one sibling takes the 1968 vacation album, another takes the 1974 wedding album, and a cousin takes loose childhood snapshots, no single person retains a complete record of the family history.
Instead, designate one family custodian (or work together in a shared physical space) to keep the entire collection intact until it is inventoried, triaged, and digitized. Once a digital master archive exists, distributing physical keepsakes becomes far simpler and free of conflict.
2. The Three-Pass Triage System#
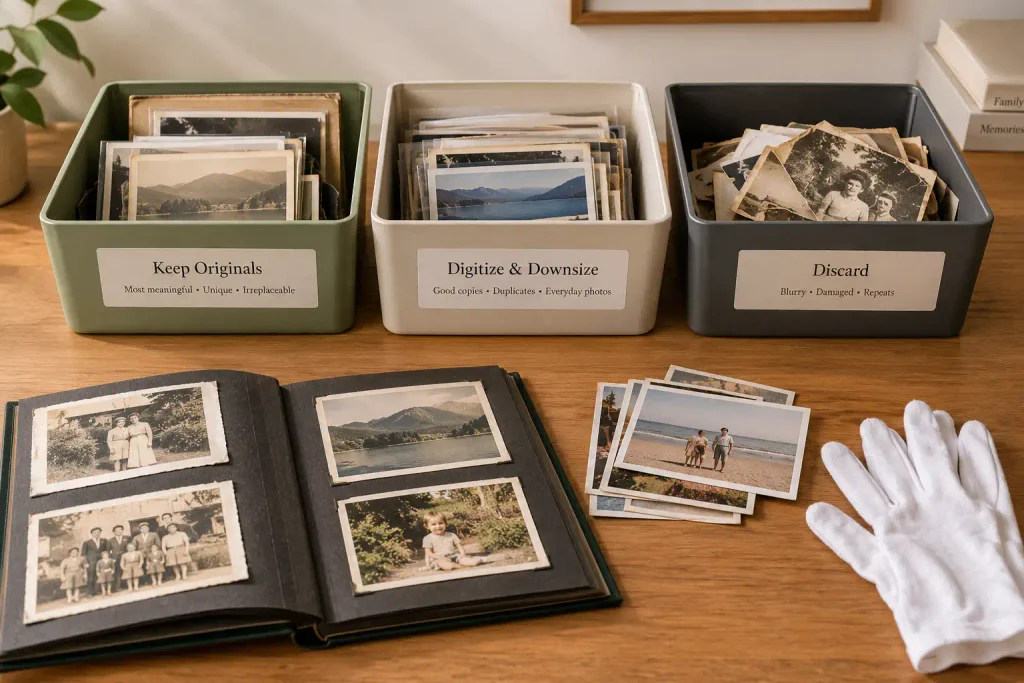
You do not have to evaluate every single photograph on day one. Trying to make an emotional decision on 3,000 prints individually is the fastest way to abandon the project.
Set up three bins or boxes: Keep, Toss, and Review / Research. Work through the albums in passes.
Pass 1: The Easy Discards (Toss Without Guilt)#
Older film processing routinely produced doubles, blurry exposures, and test shots. Discarding these prints does not erase your parents’ memory; it clears away the noise so their real lives can be seen.
You can immediately toss:
- True duplicates: Keep the cleanest, sharpest copy and discard redundant prints.
- Damaged beyond recognition: Severely water-damaged, moldy, or completely out-of-focus prints. (Note: If active mold is present, isolate those photos immediately in ziplock bags to prevent spores from spreading to the rest of the collection).
- Context-free scenery and empty landscapes: Five consecutive photos of an unidentifiable mountain range, hotel swimming pool, or highway sunset from a 1982 road trip.
- Strangers with zero emotional anchor: Random tourist shots or crowds where no family member is present.
Pass 2: The Core Keepers (Physical Heirlooms)#
These are photographs that carry historical, tactile, or deep sentimental value. They should remain physically preserved in archival housing:
- Rare ancestral portraits (daguerreotypes, tintypes, cabinet cards, black-and-white prints from before 1950).
- Major life milestones: weddings, graduations, military service, baby portraits, and multi-generational family gatherings.
- Any photograph with handwritten names, dates, or personal notes on the back.
- Prints that capture personality: your parents laughing together in their first apartment, working in their garden, or cooking a holiday meal.
Pass 3: The “Digitize and Release” Middle Ground#
A large portion of 1970s–1990s color prints fall into this category: 24 shots of a single birthday party, school sports events, or workplace gatherings.
- Keep 1 or 2 representative prints for the physical archive.
- Scan the rest at high resolution for digital sharing.
- Once verified as backed up, the physical duplicates or secondary shots can either be offered to other relatives or let go.
| Photo Category | Physical Action | Digital Action |
|---|---|---|
| Heirloom Portraits (Pre-1950) | Keep in archival sleeves | Archival Scan (600–1200 DPI) |
| Milestones (Weddings, Military) | Keep original prints | Archival Scan + Back of photo |
| Everyday Snapshots (1970s–2000s) | Curate to best 2–3 prints per event | Scan keepers; discard remainder |
| Blurs, Doubled Prints, Empty Landscapes | Discard | None |
| Unidentified Relatives | Place in “Review / Research” box | Scan and share with cousins to identify |
3. The “Magnetic” Album Emergency: Rescuing Photos Without Tearing Them#
If your parents were taking photos between 1965 and 1995, you will likely encounter self-adhesive or “magnetic” albums. These albums contain thick cardboard pages lined with sticky glue stripes covered by a peel-back plastic sheet.
These albums are chemical traps for photos. The adhesives contain acidic compounds that leach into the photo paper over time, turning the pages yellow or brown and permanently staining the prints. Worse, the adhesive hardens, effectively fusing the back of the print to the cardboard.
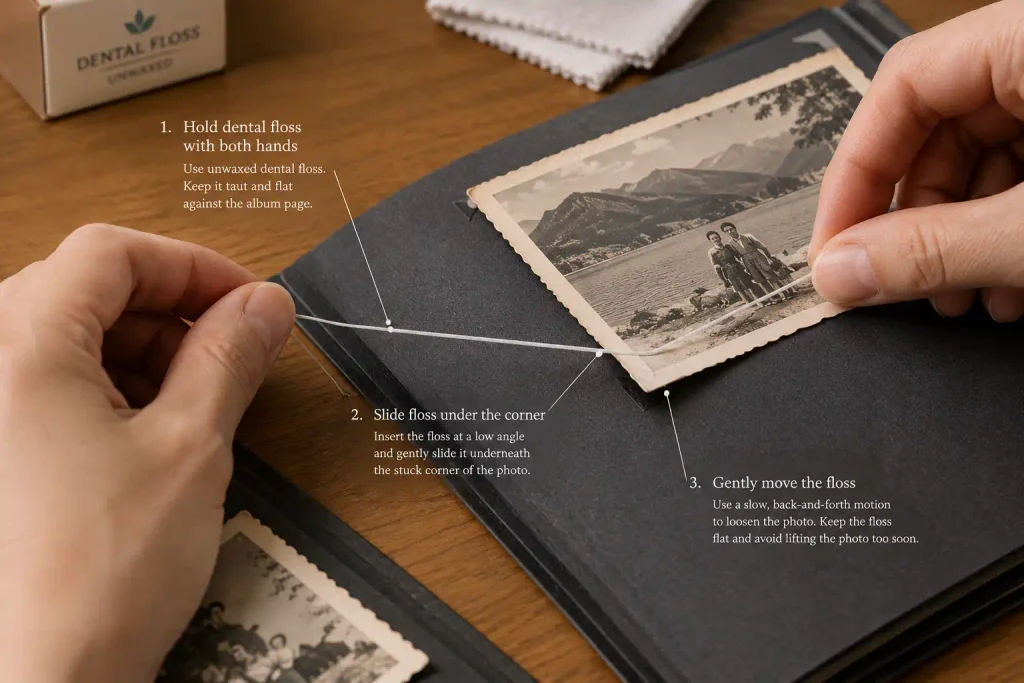
Safe Extraction Techniques#
Never pull up on a stuck photo by its corner. Pulling upward cracks the photo’s delicate emulsion layer and will tear the image in half. Use these archivist techniques instead:
- Digital insurance first: Before touching anything, take a high-resolution flatbed scan or a clear, glare-free smartphone photo of the entire album page. If a print is damaged during removal, you still have the visual record.
- The Unwaxed Dental Floss Method: Take a long strand of standard, unflavored, unwaxed dental floss. Hold it taut against the album page and gently slide it under one corner of the photo. Using a slow, back-and-forth sawing motion, work the floss underneath the print, keeping the floss flat against the cardboard. This shears the adhesive without bending the photograph.
- The Micro-Spatula / Palette Knife: If floss catches, slide a thin, flexible metal micro-spatula or Teflon bone folder slowly under the print at a parallel angle to lift the adhesive lines.
- Thermal Weakening (The Hairdryer Trick): Direct a hair dryer on its lowest heat setting toward the back of the album page for 10–15 seconds. The gentle heat softens aged adhesive enough to allow the print to slide free. Never apply direct, high heat to the photographic face.
- The Freezer Method: For stubborn prints, place the album page inside a clean, sealed plastic bag and place it in the freezer for one to two hours. The cold causes aged glue to become brittle, allowing the print to release with minimal resistance.
If a photograph refuses to budge after these methods, leave it alone. Trying to force it will destroy it. Keep the album intact or scan the page as-is.
4. Archival Scanning Standards#
Digitizing your parents’ photo albums ensures that if a fire, flood, or natural decay occurs, the family history survives. But scanning needs to be done correctly the first time to avoid having to re-scan years down the road.
Recommended Scan Specifications#
- Standard Prints (3×5, 4×6, 5×7 inches): Scan at 600 DPI (dots per linear inch). A 600 DPI scan allows you to double the print size or crop a small detail without visible pixelation.
- Small Prints and Wallet Photos: Scan at 1200 DPI to capture facial detail.
- 35mm Slides and Negatives: Scan at a minimum of 2400 to 4800 DPI. Because 35mm film is physically small, standard print resolutions will result in tiny, unusable files.
- File Formats: Save master copies as uncompressed TIFF or maximum-quality JPEG files. Avoid aggressive cloud compression that discards image data.
Don’t Skip the Back of the Photograph#
One of the most frequent mistakes family archivists make is scanning only the image.
If a photo has handwriting on the back—a date, a name, a location, or a studio stamp—scan the reverse side immediately after the front. Use a consistent naming convention so they stay paired:
1952-Summer-LakeTahoe-Front.jpg1952-Summer-LakeTahoe-Back.jpg
5. Storing Physical Photographs Safely#
Once you have culled the collection and digitized the priority photos, store the remaining physical prints where they will not degrade.
The Library of Congress and the National Archives emphasize three environmental rules for photograph storage:
Avoid the “Storage Death Traps”#
Never store photos in an attic, basement, or garage.
- Attics suffer from severe heat fluctuations that accelerate chemical breakdown and yellowing.
- Basements and garages harbor moisture and humidity that cause photographic emulsions to stick together and foster destructive mold.
- Store boxes inside a climate-controlled area of your home: on a closet shelf or under a bed in an interior room.
Choose Certified Enclosures#
Look for storage boxes, folders, and plastic sleeves that have passed the Photographic Activity Test (PAT / ISO 18916). The PAT certifies that the storage material will not react chemically with photographic emulsions or cause yellowing.
- Safe Plastics: Enclosures made of unplasticized polyester (Melinex or Mylar), polypropylene, or polyethylene.
- Dangerous Plastics: Never use cheap vinyl or PVC (polyvinyl chloride) photo sleeves. PVC smells like a new shower curtain and emits plasticizers and hydrochloric acid that destroy photos.
- Paper Enclosures: Use acid-free, lignin-free archival envelopes or boxes.
How to Label Photographs#
Never write on an old photograph with a ballpoint pen, rollerball, or felt-tip marker. Ink bleeds through paper over time, and ballpoint pressure leaves permanent indentations on the front emulsion.
- Use a soft 2B or 4B graphite pencil to write lightly along the outer white edge on the back of the print.
- If the back is glossy plastic-coated paper that rejects graphite, use an archival pigment pen (such as a Pigma Micron with waterproof, acid-free pigment ink) and let it dry completely before stacking.
6. The Context Problem: Why Hard Drives Become Digital Junk Drawers#
Once you complete the massive task of scanning, you will encounter the deeper, unspoken problem of photo archiving: fragmentation.
Too many families celebrate scanning 3,000 photos, dump the files onto an external hard drive, USB stick, or a private Dropbox folder, and email a link to their siblings. Five years later, no one has opened that drive. The USB stick is lost in a desk drawer. And when grandchildren or younger relatives do look at the files, they have no idea who the people in the photographs are.
A digital folder full of files like IMG_4021.JPG preserves pixels, but it does not preserve your parents’ lives.
Photographs only matter if future generations know:
- Who is in the image (including nicknames and relationships).
- When and where it happened.
- Why the moment was significant.
- The stories and quirks that make the memory human—how your father built the dining table in the background, or why your mother always laughed whenever that specific summer trip was mentioned.
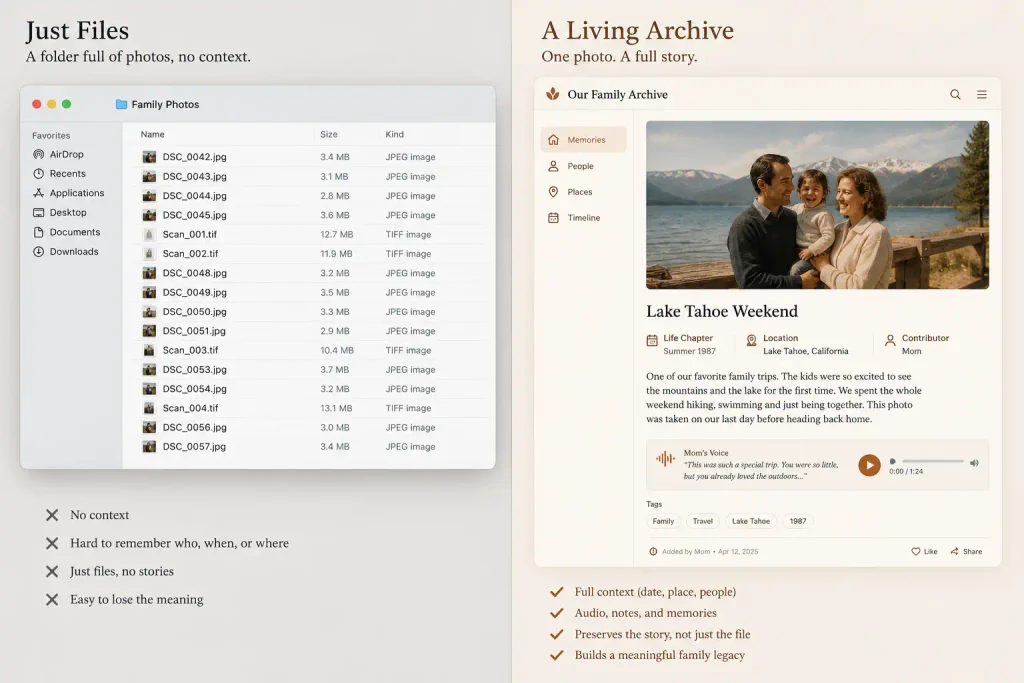
This is where creating a dedicated, family-controlled archive becomes essential. Rather than scattering files across individual hard drives or relying on ad-supported social platforms, an archive should gather the defining pieces of a person’s life in one place:
- Curated Imagery: The focal portraits and meaningful albums, preserved in their original resolution rather than compressed into oblivion.
- Audio and Spoken Context: Old voicemails, cassette recordings, and spoken memories from family members that let future generations hear how someone sounded.
- Interactive Milestones: An unhurried life timeline that connects childhood, service, relationships, migrations, and careers into a clear narrative.
- Collaborative Memory: A space where siblings, cousins, and old colleagues can add their own stories and photographs without needing technical skills.
Platforms like Theirs are designed specifically to solve this context gap. Unlike transactional obituary directories or advertising-driven social networks, Theirs functions as a permanent, collaborative family archive. You can set up a clean, dedicated space (e.g., theirs.page/robert-carter) where family members can explore curated albums, listen to preserved audio clips, and read the personal stories that explain the photos.
Because Theirs operates without recurring monthly subscriptions, family caretakers don’t have to worry about paywalls locking down access years later. Most importantly, it supports multiple caretakers and allows you to nominate a successor caretaker—ensuring the archive you build today remains protected and cared for across generations.
7. How to Divide Albums Fairly Among Siblings#
Once high-resolution scans are secured in a shared family archive, the pressure around dividing the physical originals drops dramatically.
To distribute the physical prints fairly and without conflict:
- Host a Family Gathering (In Person or Virtual): Walk through the collection together. Looking at the albums as a family often surfaces forgotten stories that should be recorded or noted down.
- Use a Round-Robin Selection System: If two siblings want the same original photo or album, use a simple draft system. Sibling A chooses one keepsake, Sibling B chooses the next, alternating until everyone has selected the items most meaningful to them.
- Prioritize Personal Relevance: A photo that features one child alone at summer camp naturally belongs to that person. Multi-generational heirlooms (like great-grandparents’ wedding portraits) can stay with the family historian or the sibling who has safe, climate-controlled space to preserve them.
- Print Heirloom Replica Books: For the 100 most defining family photos, consider publishing a hardcover photo book. You can print identical physical copies for every sibling. That way, everyone gets the tactile pleasure of flipping through the family’s history on their coffee table, regardless of who holds the original vintage prints.
8. What to Do With Truly Unwanted or Orphaned Photos#
Even after thorough sorting, you will likely have a stack of photographs featuring distant ancestors or community members that no surviving family member recognizes or wants.
Before discarding them into the recycling bin, consider these respectful preservation avenues:
- Local Historical Societies and Archives: If your parents lived in a specific town for decades or participated in notable local civic, labor, or educational institutions, the local historical society or municipal library may gladly accept photographs showing local streetscapes, businesses, school classes, or community events.
- Genealogical Platforms (FamilySearch): You can upload scans of identified historical relatives to free public genealogical repositories like FamilySearch. Third-cousins or researchers tracing shared ancestry decades from now may find the exact branch they were missing.
- The “Cousin Outreach”: Before discarding portraits of great-aunts or second cousins, take a quick snapshot with your phone and send it to your extended family WhatsApp group or email chain. Cousins often have the missing half of the photo collection and are thrilled to claim an original you didn’t have room for.
- Respectful Letting Go: If an image is unidentifiable, holds no historical interest, has been offered to relatives, and is completely degraded, give yourself permission to discard it. Your parents did not take photos with the expectation that they would become a burden to their children. Preserving their legacy means keeping what mattered, not keeping every piece of paper they ever possessed.
